how to draw 3d cartesian space
Read Time: 15 mins Languages:
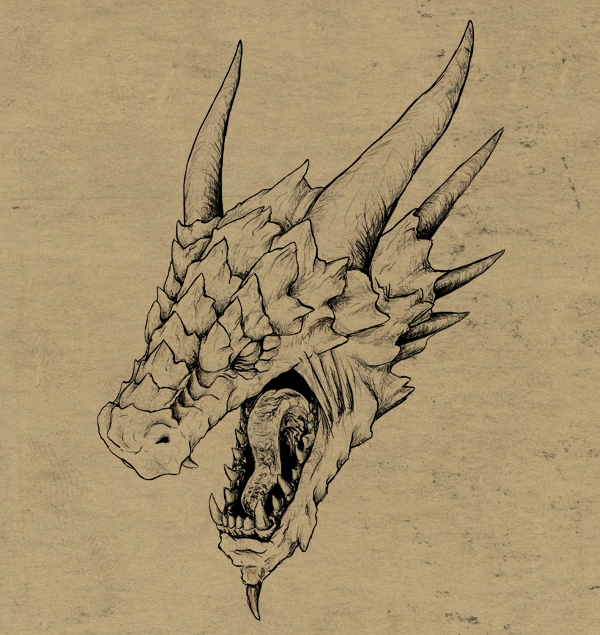

Dragons are beautiful creatures that, unfortunately, don't exist. This simple fact makes drawing them quite problematic - is there any way to describe them correctly? I tin show you how to draw a dragon head in a realistic style, in every pose in 3D space. Y'all just need to consider the basic structure of a skull shape and piece of work from there.
1. View the Skull in 3D Shapes
Step 1
Here's a 3D model of a dragon skull I've created for you (you tin can download it and use every bit your reference in any 3D software). I'm going to refer to this 3D model to show you lot the key areas on the skull. Tin can you identify the upper jaw, the lower jaw and the brain case? Y'all could even choice out the eyeball socket, the nostrils, teeth and horns. If yous consider each 1 of these areas, you can build upon information technology to blueprint your ain dragon. That's all we're going to need.


Stride 2
Here's a program of the same skull. Simplified plans are the best fashion to start a drawing. This plan is all the same too complicated, though. In that location are too many weird angles you'd need to have care of when turning the caput. Let'south simplify it fifty-fifty more!


Step iii
There it is! As you can see, it'southward less accurate - it doesn't fit the skull'due south outline whatever more. However, simple shapes brand the pose establishment easier, and we tin can rework them later to suit our needs.

Step iv
While the upper part's movement depends on the neck, the lower jaw can movement on its own up and downwardly (and sometimes left and right likewise, merely pure carnivores can't actually chew). The circle point shows the centrality of rotation we'll need later. Try looking at other skulls of carnivores for examples of this machinery, similar crocodiles. They have long palates which rotate on a similar axis.


Step 5
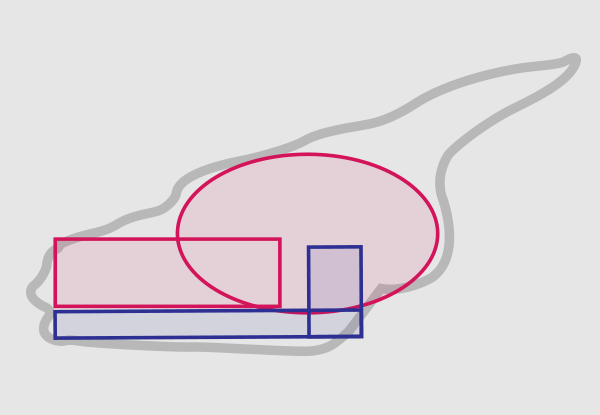
OK, so we know how to depict a dragon head from ane side. But if you tried drawing dragons earlier, you probably guessed how to become this far on your own, as information technology'south quite intuitive. What you desire to learn is how to create a 3D pose, right? So, let's create 3D blocks of the second shapes that the skull is congenital of.
Basically, we've got an oblate brawl, a cuboid and an "50" shape laying flat. These blocks volition let u.s. build a dragon head!


2. Create a 3D Pose
Before we showtime, let's get technical. This tutorial will be based on simplified perspective tips. While it's non "technically" accurate, it's a adept exercise to practice the thinking in 3D. How you envision a dragon may exist different to how I do; that is completely fine. However, we're going over the 3D mechanics of a skull for the initial part of the tutorial and this theory work volition be valuable for your own creations.
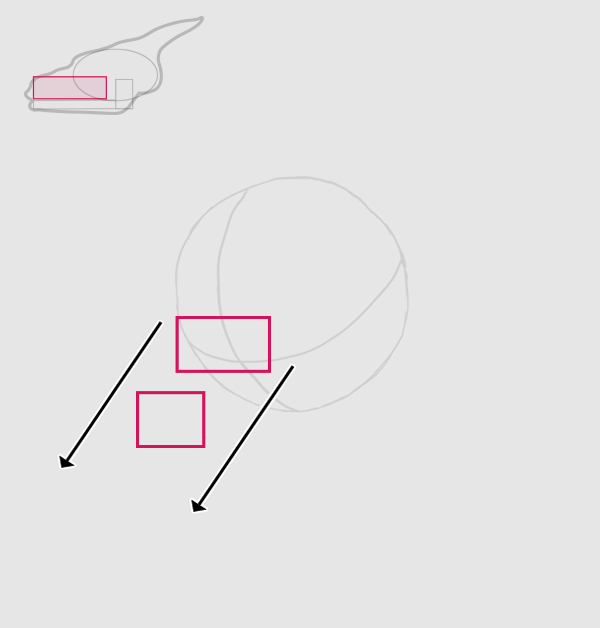
Footstep 1
Let's start with a ball. It doesn't need to be perfectly round, what we practice now is but a sketch, a base of operations for something more than.
- If you draw traditionally, keep the sketch light and almost invisible (a hard pencil may be good for this phase).
- If you draw digitally, proceed the sketch on a layer you'll be able to delete later.
The pointer shows the direction our dragon will be facing.


Step two
Time for the upper jaw. Nosotros need to draw the 3D cuboid. Intuitively, nosotros should draw two rectangles. As the oral cavity is tapered, you'll demand to make the rectangle at the front of the rima oris smaller.
The vertical altitude should depend on the mouth's length, while their horizontal altitude should depend on the arrow'south direction. It'due south only partially right, though.

Step 3
The one-point perspective cube that we describe in geometry classes is, in fact, an impossible figure. This means yous can describe it, but information technology doesn't be in 3D space. Don't believe me? Just take any cube and try to place it a position to see a perfect square and a scrap of two sides at the same time. Surprised?
To make the mouth more natural, we need to tilt one of the sides - a or b. The next step will get into more detail about this.


Step 4
Here comes some math! If you're familiar with perspective rules, you can skip this footstep. The rest of you, don't worry - you don't need to larn everything by center, these rules are pretty like shooting fish in a barrel to follow:
- When all the sides are the same lengths and the angles are 90 degrees, we can see a foursquare.
- When you rotate the effigy horizontally, the left or right side appears. The more than you rotate, the shorter
candaget, so more of the new side is visible. - When y'all rotate the effigy vertically, the top or bottom appears. The more you rotate, the shorter
banddbecome, so more of new side is visible. - You tin can't meet both the pinnacle and bottom at the same time.
- You lot can change the angle betwixt sides to come across 3 of them at the same time.


Step 5
Let'due south come back to the dragon. Now create the right 3D shape. You are free to use any lengths and angles for now, but later yous'll need to lucifer the other elements to them.


Step half dozen
Nosotros'll depict the lower jaw now. Do you remember the "L" shape? It should be longer than the upper jaw, with an additional part fastened to it. It also needs to exist placed right under the upper jaw.
My mouth is going to be tapered, and then the part in the forepart is smaller then the ane behind it. Observe that I adhere the bigger part to the back of the upper jaw.


Pace vii
Since the lower jaw is longer than the upper jaw, and they both commencement at the aforementioned point, nosotros need to move the back part a flake deeper. To find the correct direction for information technology, you tin can draw two lines across the upper jaw'due south sides. If your mouth is tapered like mine, you need to pretend it'southward a cuboid for a moment.


Step 8
Now just "slide" the back office across your guides to go the correct distance.


Pace 9
This is the easy office: depict in the rest of the jaw.


The pose is gear up! Look... A dragon with its mouth closed is a peaceful dragon, but what if we want to draw a fearsome muzzle seething with anger? Come across the adjacent steps if you want to learn the respond.


3. Depict an Open Oral cavity in 3D Space
Step 1
If nosotros want an open up rima oris, we need to draw the rest of the "50" shape. Its dorsum, upper part will be the axis of rotation; we need this axis to define the side by side pose.


Footstep two
Let's open the mouth as much as possible (a correct angle is the limit, in my opinion). A 90 caste rotation is quite easy to do; the superlative becomes front side and the back becomes top. The correct side just switches the lengths.


Step iii
Nosotros demand to find the middle of the mouth. To do this, draw a line beyond the upper jaw and the rotated block. Then depict a vertical line down. The angle betwixt the ii lines is 90 degrees, but perspective alters it.


Step four
Imagine a huge circle with a heart in the corner of our correct angle. Draw simply the part that's between the lines.


Stride 5
An open mouth will be moving along a curve. You tin see the front part of the lower jaw will keep narrowing while sliding down, until we terminate seeing its forepart (and the inside is visible instead).


Step 6
To have the mouth wide open, yous need to draw the front of the mouth turned away from you, then connect information technology every bit usually with the rotated back part. The lower lip should touch the curve.


Step 7
Since you know how the closed and fully open oral fissure looks, yous can easily find every transitional position. You just need to imagine the "50" part rotating over the centrality, and the oral fissure sliding over the curve between jaws. Remember to e'er touch on it with the lower lip!


Step 8
This is how my dragon guide sketch looks. If you're cartoon traditionally and your sketch looks very messy at present because of all these lines we don't need any more, you can trace the sketch on a new page. Keep it light! If you're drawing digitally, just lower its opacity, lock information technology, and create a new layer.


4. Form the Basic Construction of the Dragon
Step one
Once we have our simple blocks divers, nosotros demand to add more complicated blocks to pad out the face up. When you depict a dragon without thinking almost 3D, y'all just draw an eye or eyes, nostrils and horns, and that's all. The whole face is flat and unnatural. You need to plan the face masses showtime, and then describe all the bulges and depressions. Meet them in 3D!
Again, it'south even so in the sketch stage. Information technology means you need to keep the new lines light (or on a new layer). Let's draw the upper jaw first. It should be continued to the brawl, simply you lot don't actually demand to be strict with the shape. Utilise the pose sketch every bit a guide, simply don't trace it.


Stride 2
Draw a forehead too. As you can encounter, I didn't worry about the model's size at all. It's the management that matters.


Step 3
Add the brow ridges at a whole brow'due south width. Yous can even describe them from the nose to the cease of the head.


Step iv
The lower jaw is almost traced, as in that location'due south no room for any changes (even so).


Step 5
Identify the eye in a socket. Where to place it? Ane helpful tip: herbivores generally have their eyes on both sides of the head for the widest field of vision possible (to come across an enemy while eating). Carnivores accept their eyes on the front of the face for a precise sight (compare a horse and a lion). Therefore:
- If y'all desire a dragon with gentle look, place its eyes relatively far from the front of the face.
- If you desire a murderous beast, place its eyes closer to the rima oris.
Can y'all approximate what kind of dragon I drew?


Step 6
Since all the shapes are nicely defined, we can kickoff drawing for real! Grab a softer pencil or create a new layer and let's go!


five. Describe the Dragon's Features
Pace 1
While horns look pretty easy to draw, people tend to have problems with them. Anybody has their own style, but if y'all want your dragon to look natural (so, more realistic), don't make them sharp. Horns clothing downwards when used! As well, directly ones look quite artificial, so bend them a little.


Pace ii
Dragons are generally covered with pocket-sized scales that resemble skin (like snakes), or with big plate-scales. While small scales are very easy (and ho-hum) to draw, plates are what make them look massive and armored. Once y'all learn how to draw them, you lot'll see information technology'south much faster than covering whole body with a bazillion little ellipses! So, 3 tips:
- Yous can imagine a single plate-scale is a mitt with iii fingers. This mitt tries to embrace the surface it'south laying on, so most of the time nosotros'll encounter just a one-half of information technology (two fingers).
- When the scales grow bigger, they don't just increment their size - they're like fractals. It works like a growing tree that gets more branches with a time.
- Scales lay upon each other, simply they're not glued together; when their base is bending, they "open up".


Step three
When you draw a scale (or anything made of natural material), information technology doesn't need to be perfect. Nature isn't perfect! Scales aren't made of plastic; they have been growing for a long time, in the rain and cold; they have been hit and scratched, and that has inverse them. (Or, if your dragon is made of adamantium, nothing changed them. Perfection is fine in that example.) Don't be afraid to raise your pencil and come back to the line you merely started - long, shine lines give a cartoony look. Don't try to fix your lines either, or you'll get a mess.


Step four
Since we know how the scales piece of work, nosotros tin can offset to dress our dragon. Kickoff, we'll take care of the eyebrows. They await only like tapered cylinders, so it'southward easy to imagine how the scales should be placed. Start with the i on the front - the only 1 that volition exist fully visible. Then draw another, a little bigger, and and then on. Every other scale may exist more complicated than the previous one, simply as if you were drawing them growing!


Step 5
Now, identify your scales from the nose to the stop of the caput. This time they're quite similar, equally the surface they're laying on barely changes its shape. They likewise can lay flat.


Pace half dozen
I'm not going to teach you virtually an centre'south shape, because they can be actually different. Notwithstanding, there's one universal thing: the heart is placed in the eye socket, covered with eyelids, and protected with 2 big bone masses - the brow ridge and the zygomatic bone. In that location are two things to recollect:
- If dragon'due south skin is very thick, the eyelids are probably quite thick also - therefore, when the heart is open, the eyelid volition have a stiff contraction.
- There's a right angle between the top of the zygomatic bone and the eyeball, so proceed that in mind when irresolute the pose.


Footstep seven
This is how I drew the eye:


Step eight
Time to draw the balance of the oral fissure. Depict it with your hand shaking - this way you'll go a lot of interesting shapes, which are and so much better than slow smoothen lines. Besides, can you run into the picayune depression? It'due south not required; you can keep your mouth circular if you want.


Step nine
Allow's draw the lower jaw! Information technology's going to exist quite complicated, because of all the teeth and then on, so let's take it tiresome. First, describe the forepart part of the jaw (a shaking hand volition assistance you once more). Nosotros also need to add this potent jaw musculus that opens the rima oris. The bigger the angle of opening, the more than stretched the muscles. This tension adds a lot to the picture!


Step 10
By and large, teeth are going to use the same curve to slide over when the mouth is opening, because the upper and lower ones want to see - merely like the jaws. Likewise, don't forget:
- Teeth article of clothing out too! Don't make them all pointy or they'll seem unused.
- The kind of teeth tells a lot most your dragon. Should they be similar a T-King's, or more like a lion's? What does it swallow, and how does it chase?
- Dragons can't betrayal their gums like wolves, because their skin is much harder, but they nevertheless should be visible when the mouth is open.


Footstep xi
A tongue is unremarkably plump, so don't brand it flat. Information technology needs to help the huge beast eat quite big things, after all! Points to consider:
- If your dragon can squirt its tongue long out of the mouth while roaring, enquire yourself: what's the indicate of this? I don't really know whatsoever creature that does it, so you need to find a practiced reason to go far "realistic".
- A forked tongue is an organ of smell. Snakes motion picture their tongues out all the time and, theoretically, your dragon should do the same if it has a forked tongue. Otherwise, it's pointless!


Footstep 12
The head is most consummate, and then let's just add an chemical element to merge both jaws together. You can use bony wings here, additional horns and spikes, anything you like! Just remember - information technology all should serve a purpose (for case, to look bigger or more than bonny for a potential mate).


Footstep 13
So, the head is done! Information technology's still just a line fine art, then if you lot want to acquire how to make it more attractive, see the next step.


half dozen. Add a Spark to Your Drawing
Step 1
Nosotros're going to do the inking now. Digital artists are in a amend position here, but traditional markers and ball pens volition exercise too!
Our picture is made of lines of almost the aforementioned width. Stress some of them to add importance to the various areas.


Step two
Add some darkness to wherever it's needed. Here, I want to testify the difference between the within and the outside of the mouth.


Step 3
Embrace the horns and teeth with sparse curves. They should be thinner than most of the lines that build the picture.


Step 4
Apply the same thin lines to sketch shaded areas. Go on information technology loose and fast. When you desire to darken a place, cross the lines, but don't change the pencil!


Step 5
Here is what I've got by calculation depth to the scales.


Step 6
Look at your picture and bank check whether information technology needs whatever more than contrast. If a identify is already covered with lines and you want to make it darker, you lot can use a bigger brush or softer pencil there.


Crawly Work, You're Now Done!
Yous've simply learnt how to create a 3D pose and draw a disarming dragon head. I promise you liked it! Feel free to come back here any time if you need a quick reminder.

Source: https://design.tutsplus.com/articles/how-to-draw-a-realistic-dragon-head-in-3d-space--vector-14639
0 Response to "how to draw 3d cartesian space"
Publicar un comentario